DEXTMEDI User Manual
1. Introduction
DEXTMEDI is a Solution that collects data transmitted from various medical devices and converts it into a standardized format. This document serves as a guide for using DEXTMEDI. It explains how to install the software and provides instructions for the basic settings required to collect data from medical devices. It introduces methods for utilizing the collected data and integrating the solution with external systems.
DEXTMEDI System Requirements
- Operating Environment : Windows 10 or later, Windows Server 2016 or later
- Execution Mode : Service Mode / Program Mode
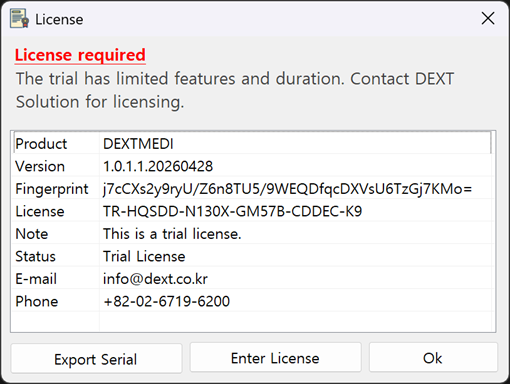
Trial License
The trial license is valid for 30 days. Some features are unavailable.
Genuine License
- The full license is tied to the specific PC on which it is installed.
- Install the trial version on the target PC, obtain the serial information from the License screen.
- For more information on purchasing a genuine license, please contact our Customer Service Center (info@dextsolution.com).
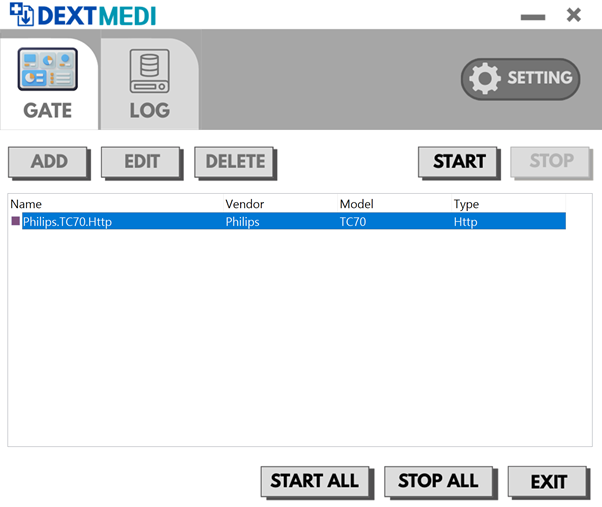
2. Screen Layout
The interface of DEXTMEDI is primarily composed of two main screens. The GATE screen, where integration modules are configured, and the LOG screen, which displays logs. The GATE main screen displays the operational status of currently integrated modules, actual operations can be configured through the settings screen of each integrated module. Users can switch between screens using the tabs at the top. and you can perform batch operations on registered modules or change DEXTMEDI’s default settings.

1) Common Functions
These features are displayed regardless of the selected screen.
A. GATE Tab : Switches to the GATE screen.B. LOG Tab : Switches to the LOG screen.
C. SETTING : Displays the DEXTMEDI configuration screen. For more details, please refer to the Program Settings section.
D. START ALL : Starts all registered GATE modules at once.
E. STOP ALL : Stops all registered GATE modules at once.
F. EXIT : Functions differently depending on the configured mode.
- f-1)Console Mode: Stops all running GATE modules and exits the program.
f-2)Service Mode:Running GATE modules are not stopped only the configuration screen is closed.
2) GATE Screen
This screen appears when the GATE tab is selected. It displays a list of currently registered GATE modules and allows you to edit them.
-
A. ADD : Adds a new GATE module. For more details, please refer to the Adding a GATE section.
B. EDIT : Edits the GATE module selected from the list.
C. DELETE : Deletes the GATE module selected from the list.
D. START : Starts the GATE module selected from the list.
E. STOP : Stops the GATE module selected from the list.
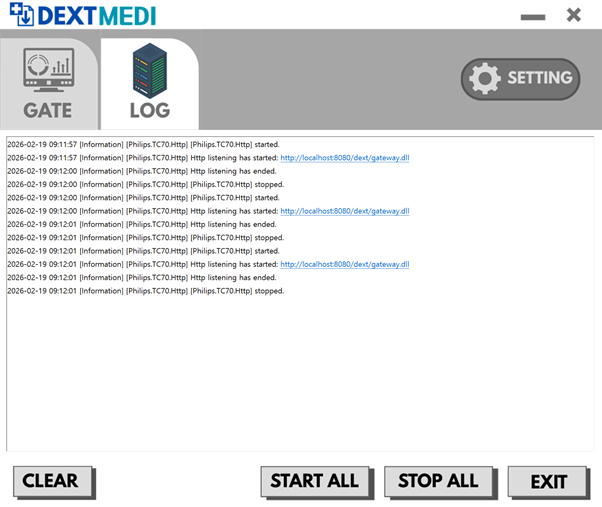
3) LOG Screen
Displays a log of the data collection and transmission status for currently Integrated GATE modules. When operating in Service Mode, logs are only displayed if real-time log display is enabled.
-
A. CLEAR : Clears the currently displayed logs. Only the displayed screen is cleared, logs recorded in the file remain unchanged.
3. Program Settings (SETTING)
This screen allows you to configure the basic settings required to run DEXTMEDI.
1) Running Mode
Configure settings based on the execution mode.
-
A. Service : Runs in Windows system service mode. Even if DEXTMEDI is closed, the integrated GATE module will continue to run as a Windows system service. (This option is not available in the trial version.)
B. Console : Runs in program mode. If DEXTMEDI is closed, the integrated GATE module will automatically stopped.
C. Realtime Logging : A service mode option; when enabled, you can view logs in real time even in service mode. (*May affect performance depending on system specifications.)
D. Auto Start : A console mode option; when enabled, the linked GATE module starts automatically when the DEXTMEDI program starts.
2) Logging
-
A. Level : Sets the logging level for the recorded logs.
-
A-1) Information: Records logs at the Information level only.
A-2) Warning: Records logs at the Warning level only. Information-level logs are not recorded.
A-3) Error: Records logs at the Error level only. Information and Warning-level logs are not recorded.
3) Backup
-
A. Folder : Sets the location for data backups.
B. Period : Sets the retention period for backup data. Logs older than this period are automatically deleted.
4. Add GATE
You can add GATE modules by selecting them from the DEXTMEDI list. Additional GATE modules are scheduled to be added continuously.

- Vendor: Select the manufacturer.
- Model: Select the equipment model.
- Type: Select the integration method.
Once all selections are complete, click the OK button to display the configuration screen for the selected GATE module. The configuration screen may vary depending on the GATE module.
5. Common Settings (CONFIG)
These items are required to configure the integrated GATE modules and are displayed across all GATE modules. This document describes each setting although the actual configuration items displayed may vary depending on the GATE module.
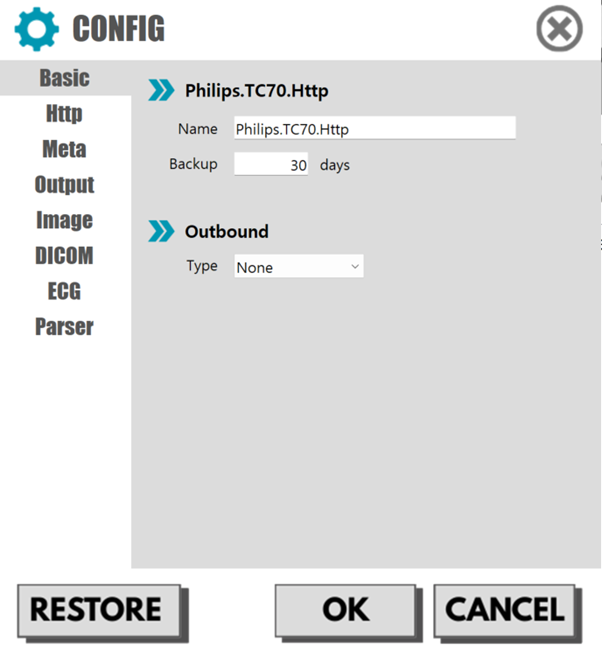
1) Basic
Configure settings based on the execution mode.
-
A. Name : This is the GATE module name displayed in the list. It is used to identify each GATE module and Duplicates are not allowed.
B. Backup : Sets the retention period for backup data. The default value is the backup period set in DEXTMEDI, but this setting can be modified for each GATE module.
C. Outbound : Select the external system to which collected data will be transmitted.
-
C-1) None: Data is not transmitted to any external system.
C-2) DEXTSolution: Transmits data to the DEXTMEDI Worklist (supports PACS, OpenAPI integration).
C-3) CustomFolder: Creates XML data files in a folder specified by the user.
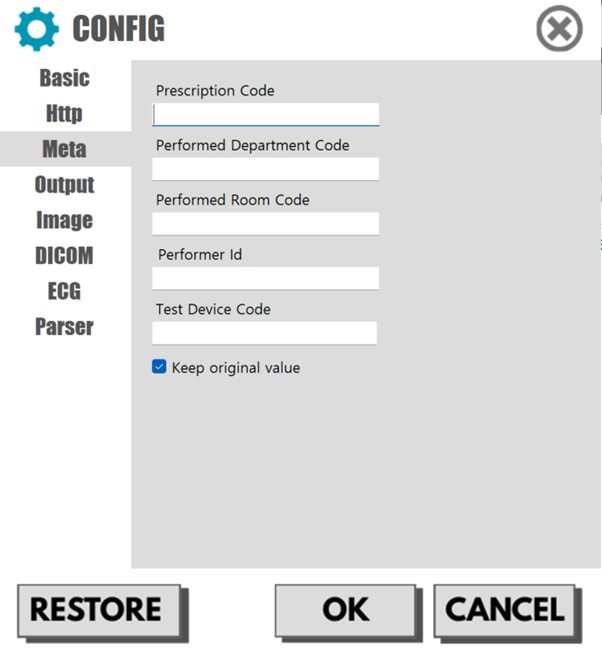
2) Meta
Manually configure additional information for inspection data
-
A. Prescription Code : Replaces the prescription code with the set value.
B. Performed Department Code : Replaces the performed department code with the set value.
C. Performed Room Code : Replaces the performed room code with the set value.
D. Performer ID : Replaces the performer ID with the set value.
E. Test Device Code : : Replaces the device code with the set value.
F. Keep original value : : If a value exists in the original data, the original value takes precedence.
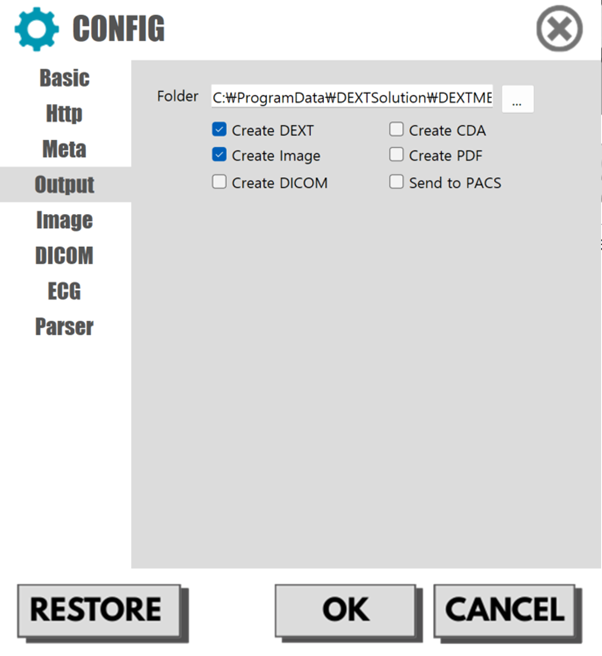
3) Output
Configure the file format to be generated by the GATE module.
-
A. Folder : Select the folder where the output files will be generated.
B. Create DEXT : Generates XML files in the format provided by DEXTMEDI.
C. Create CDA : Generates XML files in the CDA(Clinical Document Architecture) format.
D. Create Image : Generates image files (For details, please refer to the Image section)
E. Create PDF : Generates PDF files.
F. Create DICOM : Generates DCM files.
G. Send to PACS : Transmits data to the PACS.
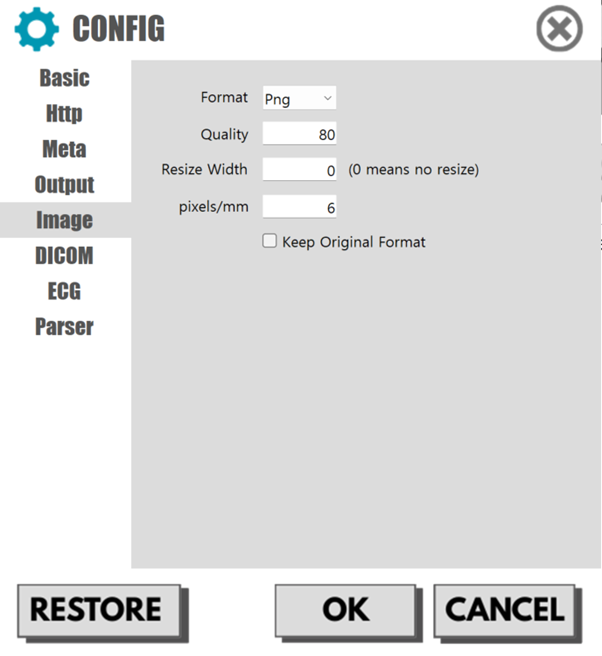
4) Image
Configure the settings required to generate images.
-
A. Format : Select the image format.
B. Quality : Sets the image quality when generating images in JPEG format.
C. Resize Width : Adjusts the width of the image. (If set to 0, the width will not be adjusted.)
D. pixels/mm : Set the number of pixels per 1 mm when generating an image based on data. Used for rendering ECGs or generating images based on numerical data.
E. Keep Original Format : Select whether to retain the original format for image data. If enabled, the original format is retained even if a Format is set.
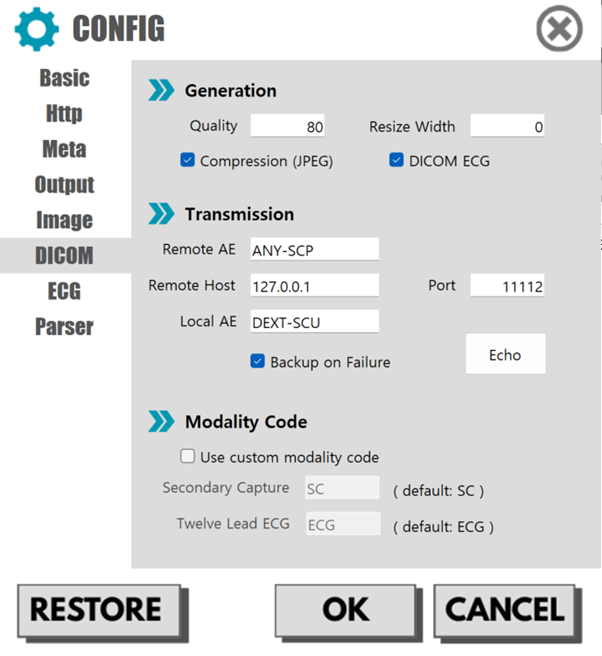
5) DICOM
Configure settings required to generating DICOM files or transmitting them to PACS..
-
A. Generation : These are settings related to the generation of DICOM data.
-
A-1. Quality : Sets the image quality when using pixel compression (JPEG).
A-2. Resize Width : Adjusts the width of the image. (If set to 0, the width will not be adjusted)
A-3. Compression (JPEG) : Select whether to use compression.
A-4. DICOM ECG : Select whether to transmit ECG data in DICOM Wave format.
-
B-1. Remote AE : Enter the AE Title of the PACS server.
B-2. Remote Host : Enter the IP address (Host) of the PACS server.
B-3. Port : Enter the port number of the PACS server.
B-4. Local AE : Enter the Local AE Title.
B-5. Backup on Failure : Select whether to perform a backup if the transmission fails.
B-6. Echo : Test the connection by sending a "C-ECHO" request to the configured PACS server.
-
C-1. Use custom modality code : Select whether to use a custom modality code.
C-2. Secondary Capture : Enter the modality code to be used when transmitting images.
C-3. Twelve Lead ECG : Enter the modality code used when transmitting DICOM ECG.
6. ECG Settings
For ECG data, you can select your desired design when generating images. Additionally You can also edit the design file to change colors or adjust positions.
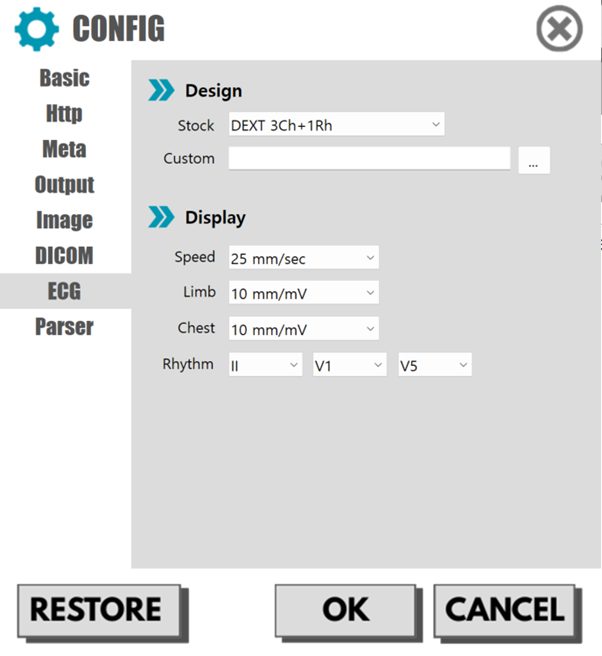
1) Design
Select the design to be used for generating ECG images.
-
A. Stock : Select from designs provided by DEXTMEDI.
B. Custom : Apply an external design file.
2) Display
These are additional settings required to generate ECG images.
-
A. Speed : Select the output speed of the waveforms.
B. Limb : Select the display size for limb lead waveforms (I, II, III, aVR, aVL, aVF).
C. Chest : : Select the display size for chest lead waveforms (V1–V6).
D. Rhythm : Select the leads to display for the rhythm.
7. Settings by Connection Method
Each GATE module displays a different configuration screen depending on the connection method. This document provides a general guide for the settings, for detailed configuration of specific devices, please refer to the manufacturer’s manual.
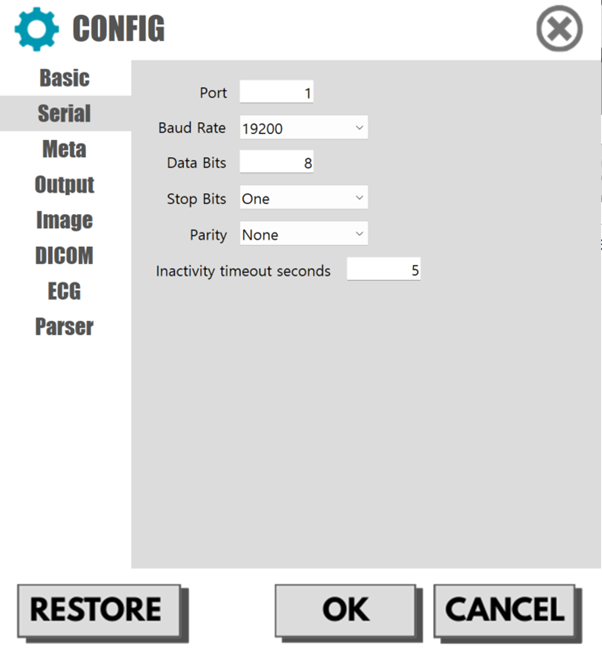
1) Serial
These are the settings to configure when the GATE module uses serial communication.
-
Port : Enter the serial port number.
Baud Rate : Select the communication speed.
Data Bits: Enter the data bits.
Stop Bits : Select the stop bits
Parity : Select the parity.
Inactivity timeout seconds : Enter the inactivity timeout in seconds. If no data is received within the set time, the system determines that all reception has ended.
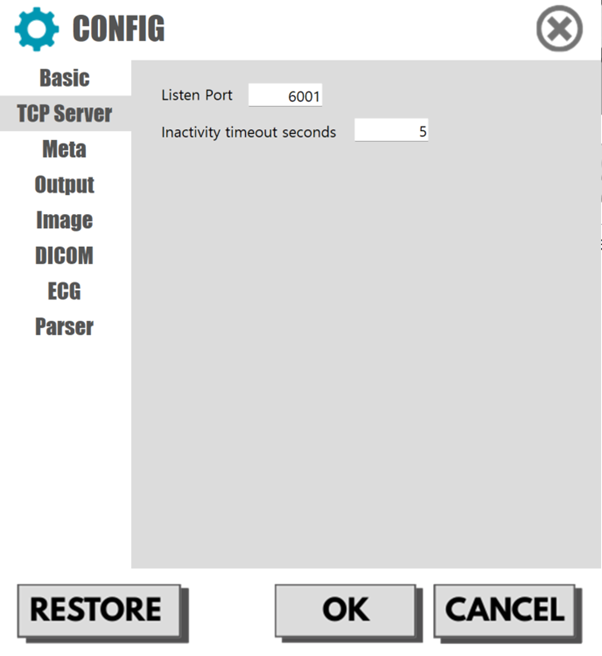
2) TCP Server
These are the settings to configure when the GATE module communicates via TCP.
-
Listen Port : Enter the port number to listen for incoming connections.
Inactivity timeout seconds : Enter the inactivity timeout in seconds. If no data is received within the set time, the system determines that all reception has ended.
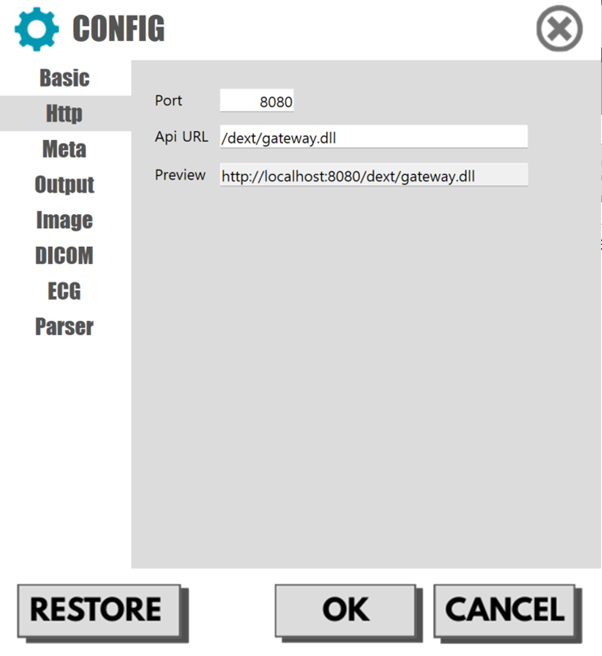
3) Http
This can only be used when the GATE module transmits data via the POST method with data included in the BODY. (This applies to Philips ECG equipment.)
-
Port : Enter the receiving port number.
Api URL : Enter the API URL to process the task.
Port : Displays an example of the API address bound (connected) to the current settings.
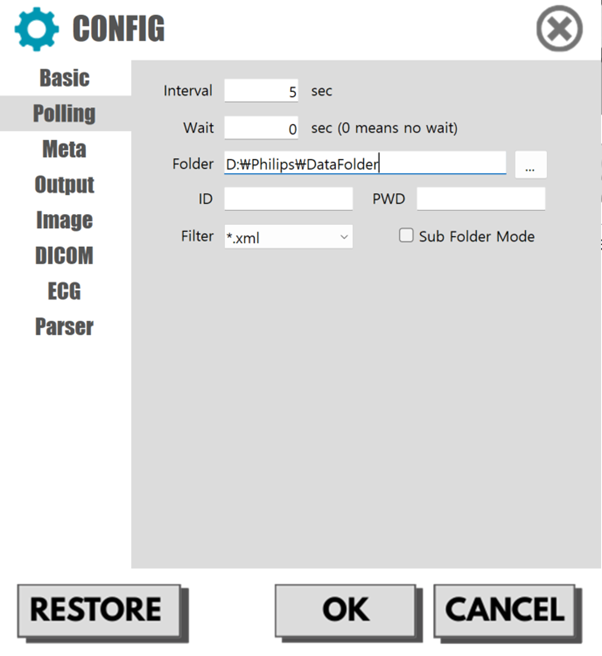
4) Polling
This is the setting used when the GATE module generates files in a specific location.
-
Interval : Enter the monitoring interval in seconds.
Wait Time : Enter the time to wait for detected files in seconds. Detection is confirmed only if there are no changes to the file during this set time.
Folder : Manually enter or select the folder location to be monitored.
ID : If the monitored location requires a network connection, enter the account name of a user with access permissions.
PWD : Enter the account password.
Filter : Filter the file extensions to be monitored.
Sub Folder Mode : When enabled, monitors subfolders created within the monitored location folder.
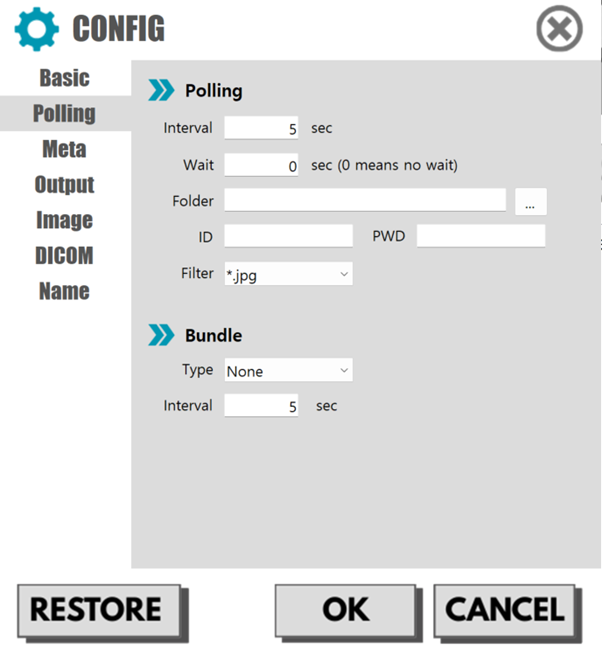
5) Bundle Polling
These settings are used when processing multiple files as a single examination dataset. The basic settings are the same as those in the [Polling] section, with the additional [Bundle] option.
-
A. Type : Select the method for determining groups
-
A-1. None : Process files individually without grouping them.
A-2. Time : Recognize files received within a certain time period as a group.
A-3. Similar : Recognizes files with similar names as a group.
A-4. Folder : Recognizes files by folder as a group.
A-5. Same : Recognizes files with the same name as a group.
8. Settings by Parsing Method
These are the settings to configure how the collected data is parsed.
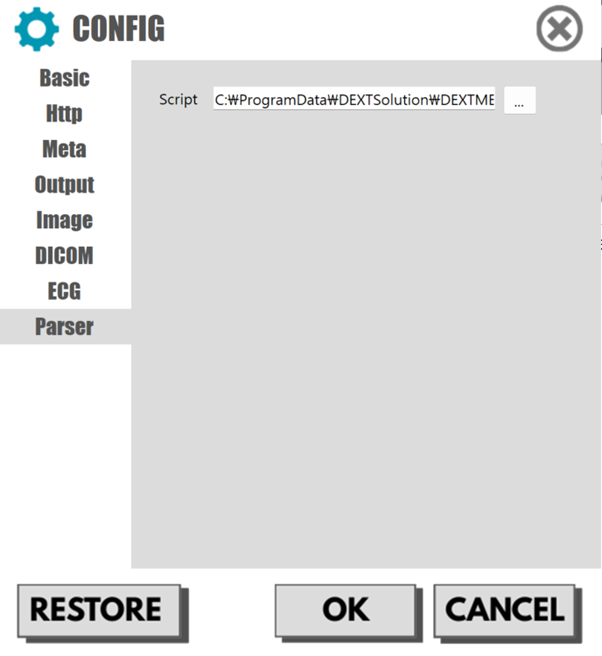
1) Script Parser
This option is available when the collected data is in XML format. Most ECG data falls into this category. Data is converted using an XSLT script, and a basic conversion script is installed along with the product. You can modify this script to process the data into your desired format.
-
A. Script : Configure the XSLT script for conversion. By default, the script provided by DEXTMEDI is automatically selected. If modifications are required, you may directly edit and use a custom XSLT script.
2) Name Parser
In the case of file polling, you can extract metadata using the file name. This method can be used when can be distinguished through delimiters within the file name.
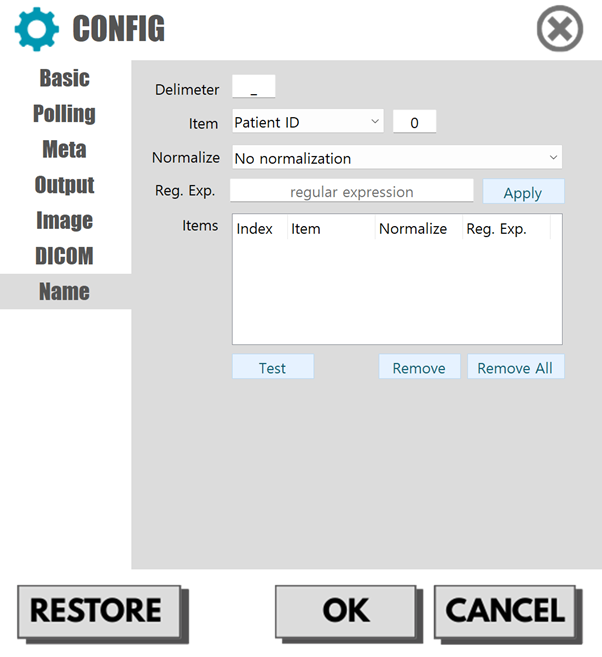
-
A. Delimeter : Set the delimiter.
B. Item Set the metadata item. If the value is extracted correctly the extracted information will be used as each item when generating XML. In the numeric field on the right, enter the index (starting from 0) where the item is located when separated by the delimiter.
C. Normalize : Set the option to normalize the extracted items.
-
C-1. No normalization : Uses the extracted items as-is without processing.
C-2. Numbers only : Uses only numbers from the extracted values.
C-3. Alphanumeric only : Uses only numbers and Alphabet from the extracted values.
C-4. Remove whitespace : Removes whitespace from the extracted values before use.
C-5. Custom regular expression : Normalizes data using a custom regular expression. If this option is selected, you must enter the actual regular expression in the [Reg. Exp] field.
C-6. Reg. Exp : Enter the regular expression string. If the string is invalid, extraction may not be performed correctly.
E. Items : Displays the currently added items.
F. Test : Runs an extraction test using the current settings.
G. Remove : Removes the selected item.
H. Remove All : Removes all items.
3) Text Parser
In the case of file polling, you can extract metadata using the file name. This method can be used when can be distinguished through delimiters within the file name.
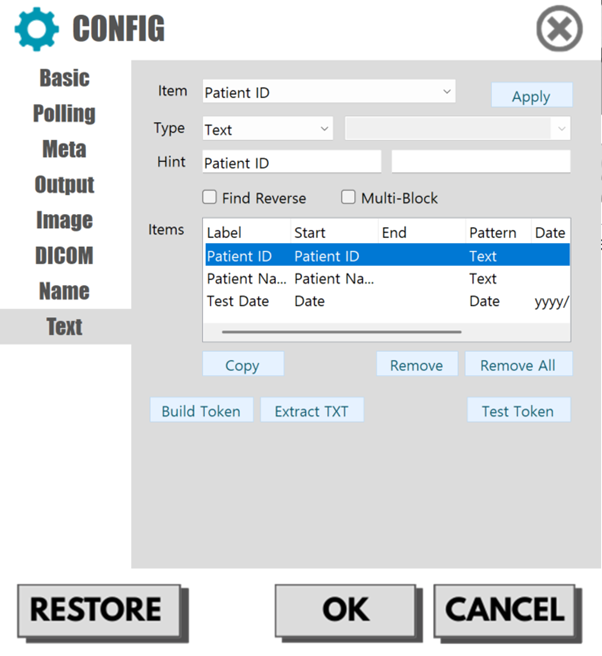
-
A. Item : Set the metadata item. If the value is extracted correctly the extracted information will be used as each item when generating XML
B. Type : Select the type of the value. For [Date], you must additionally select a format on the right.
C. Hint : Enter a hint string to locate a line in the text. Enter the start point hint in the first field and the end point hint in the second field. The system uses the entered hints to find a single string containing the value to be extracted.
D. Find Reverse : Searches by traversing the single string in the opposite direction.
E. Multi-Block : set whether the value is a multi-block value.
F. Apply : Adds the entered value as a new entry or updates an existing one.
G. Copy : Copy the selected item to the editing screen. Double-clicking an item in the list performs the same action.
H. Remove : Removes the selected item.
I. Remove All : Removes all items
J. Build Token : When a PDF or TXT file is selected, items are automatically generated using default settings. You can edit more quickly by modifying the automatically generated items.
K. Extract TXT : Extracts text from the PDF and saves it. This can be used to preview exactly which values are extracted as text.
L. Test Token : Runs an test using the current settings. This allows you to verify that extraction works correctly before actual operation.
4) Custom Parser
A custom parser is required when RAW signals are transmitted from the device. If the selected GATE operates as a custom parser, interpretation is performed automatically via the internal parser without any additional configuration. However, if the device to be integrated uses a custom data, a separate custom parser must be developed. In that case, please proceed by requesting a development consultation.
[Appendix] How to Obtain a Full License
- The DEXTMEDI license is tied to the installation PC. Please ensure you have the correct serial number of the PC you intend to use for licensing.
- Install the trial version on the PC where you wish to obtain the license, then click the [Export Serial] button on the license information screen.
- Please send an email requesting a license to the Customer Support Center (info@dextsolution.com) along with the serial file (
dextmedi-serial.dat). - The Genuine license will be sent to you via email; simply register the license file using [Enter License].